How to configure and install an SSL certificate on Plesk?
To configure an SSL certificate on Plesk, you need to go through 3 steps:
A- Obtain a CSR (Signing Request Certificate) from your Plesk account
B- Check that you are the owner of the domain you want to secure
C- Download the certificate from your client area and install it at cPanel level
A- Obtaining a CSR (Signing Request Certificate) from your Plesk account
1 - Log on to your plesk control panel: https://winwin.genious.net:8443, then click on "SSL certificates".
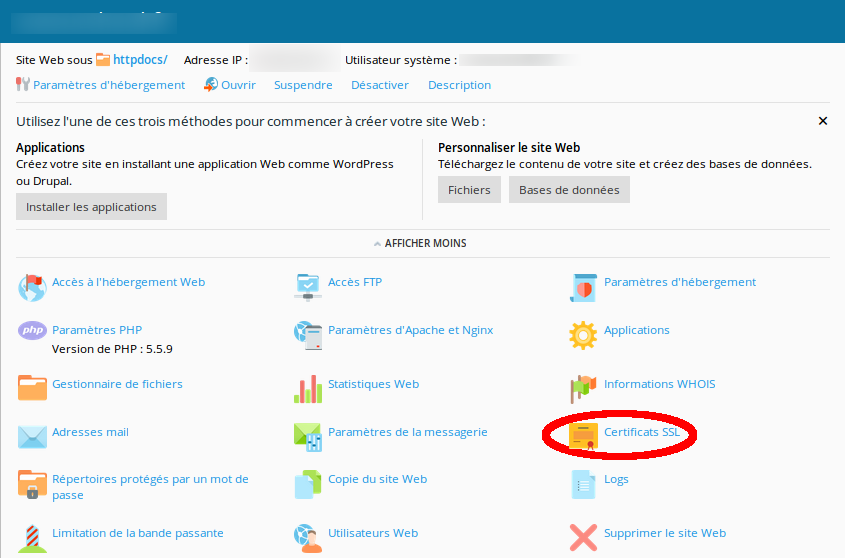
2 - Click on the "Add an SSL certificate" (Ajouter un certificat SSL) button

3- Fill in the form to create the CSR with the domain name data which appear at the Whois level, then click on "Request" (Demander)

4- Until then, the certificate has been added. At the bottom of the screen, the CSR (envelope icon) and the private key (key icon) are activated. Click on the name of your certificate to obtain this data:

5- After obtaining the CSR and the PRIVATE KEY, copy and save the two codes in a .txt file.
P.S: The CSR is essential for the release of the certificate by the CA (Certification Authority)

6- You have just obtained your CSR code! Send it to the SSL certificate issuing authority.
7- Now go to your customer area: https://clients.genious.net/clientarea.php and follow the steps below:
- Send the CSR for validation:
In your customer area, click on "Services -> My products and services" in the main menu on the left, then on the SSL certificate you ordered (the name of the certificate may vary):

- Once on the product sheet of your SSL certificate, click on the green button "Generate Now":

- Now you need to paste the CSR code you generated at your cPanel interface and select "cPanel" from the "Select Your Web Server" pull-down menu.

- Fill out the rest of the form with your organization information or your personal information and click on the "Continue" button.
- To verify that you are the owner of the domain, select the email address you entered at the start of this tutorial, or another authentication method, then validate.

B- Verification of the owner of the domain name:
1- Wait a few minutes (5 to 10 min) then consult your admin @ ... or webmaster @ ... email address to validate the domain by following the instructions presented.
2- After 5 or 10 minutes, go to the product sheet of the SSL certificate installed in your customer area and click on the "Download Certificate" or "Télécharger le certificat" button.
C- Download and installation of the SSL certificate:
1- If you see that the status of your certificate is "Active" (See image below), click on "Download Certificate".

- Unzip the "Certificates" ZIP file, then open the folder and click on "CER - CRT Files"
- Now go to your Plesk panel and navigate to "SSL Certificates". Insert the certificate as well as the intermediate certificate of the Certification Authority (CA Certificate), and click on LOAD CERTIFICATE.

- Congratulations! The certificate for your domain is now installed.

- Now configure your domain to enable SSL protection. On your Plesk dashboard, click Hosting Settings (paramètres d'hébergement)

- Then, in the "Security" section, check "SSL support" and select your certificate, saving the changes so that they apply:

- Perfect! You can now download your SSL certificate!
